Hello and welcome to the 12 Days of Christmas hosted by my friend Shirley from Intelligent Domestications! This is my first year participating in this blog hop and I am super excited to do so. 🙂 On this first day of Christmas, we are sharing some DIY ornaments with you. My DIY ornament is a wooden bead Christmas tree.

You can find the tutorial below and at the bottom of the post, check out all the wonderful ornaments from the many talented bloggers we have joining us for this blog hop.
If you want to check out any of the other 11 days, you can find them here:
- Day 2 – DIY Cone Christmas Trees
- Day 3 – Abstract Snowman DIY
- Day 4 – Sugared Cranberries and Rosemary Cupcakes
- Day 5 – Dollar Store Craft | Sparkly Gem Christmas Tree
- Day 6 – Christmas Gift Exchange Ideas
- Day 7 – Disney Inspired Hot Cocoa Bar
- Day 8 – Hot Cocoa Peppermint Cookies
- Day 9 – DIY Christmas Magnolia Wreath
- Day 10 – Silver and Gold Christmas Tablescape
- Day 11 – Christmas Front Porch Decor
- Day 12 – Silver, Gold and Light Green Snowy Christmas Tree
Welcome to the third annual 12 Days of Christmas Blog Hop!

Stop by every day from December first through the twelfth for new ideas you can use to make your season brighter!
Meet Your Hosts
They have all been busy as Elves creating, decorating, cooking and crafting tons of new ideas for you to try this holiday season!
Shirley~Intelligent Domestications I Alli~An Alli Event I Michelle~Our Crafty Mom
Marie~DIY Adulation I Erlene~My Pinterventures I Beverly~Across The Blvd.
Debra~Shoppe No. 5 I Victoria~Dazzle While Frazzled I Megan~C’mon Get Crafty
Michelle~Michelle James Designs I Amanda~Domestically Creative I Jeanie~Create & Babble
Deborah~Salvage Sister & Mister I Sherry~Olives & Okra I Jenny~Cookies Coffee & Crafts
Emily~Domestic Deadline I Bonbon~Farmhouse 40 I Leanna~Of Faeries & Fauna
Pam Larmore~P.S. I Love You Crafts I Kelly~North Country Nest I Marie~The Inspiration Vault
Gail~Purple Hues and Me I Lynne~My Family Thyme I Karen~Dragonfly and Lily Pads I
Trisha~Blowing Away Out West I Tomika~Life In Pumps I Rachee~Say it, “Rah-Shay”
Lorrin~Embrace The Perfect Mess I Jaime~Love Jaime I Serena~The Weekend Jaunts
Terri~Christmas Tree Lane I Jessica~A Southern Mother I Sam~Raggedy Bits
Cyn~Creative Cynchronicity I Valeria~Val Event Gal I Yami~The Latina Next Door
Jeannee~Centsably Creative I Tania~Little Vintage Cottage I Lauren~Wonderfully Made I
Vanessa~DIY 180 I Kimberly~A Wonderful Thought I Kim~Everyday Parties
Erica~Erica Ever After I Dru~Polka Dot Poplars
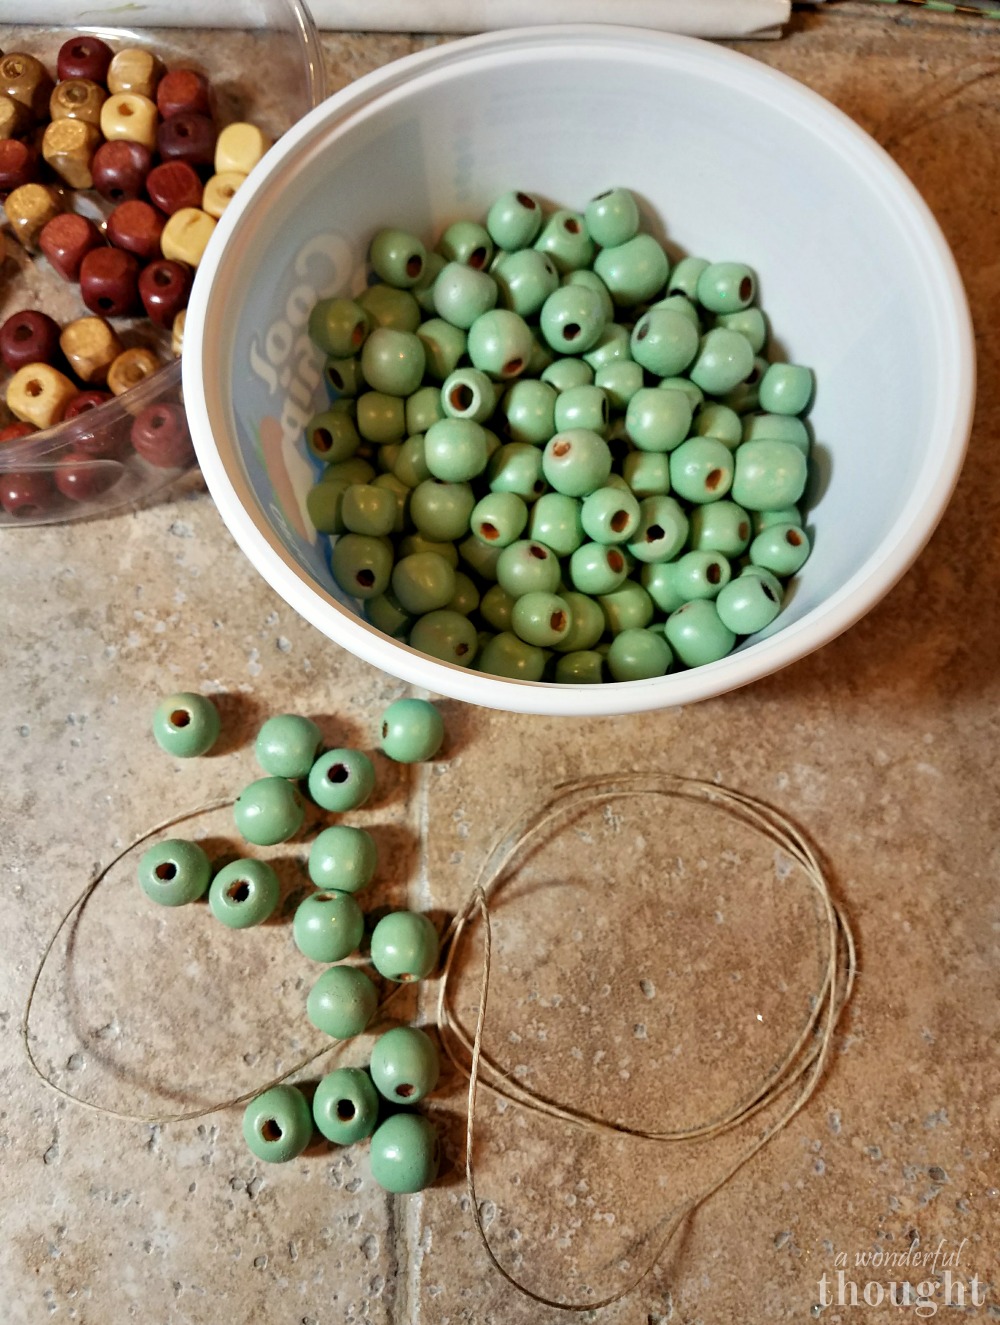
Wooden beads are very “in” right now so I was inspired to make a diy ornament from some wooden beads. I happened to have some wooden beads on hand already which made it really easy to try it out my idea. I had to play around with them a bit to figure out how to make a tree. Remember making lizards out of pony beads when you were younger? That is how I made these trees!

*There are links to products in this post that I use or are similar to products I use. If you buy something from one of these links, I may make a small commission (with no additional cost to you) from the purchase. I will not recommend anything that I would not buy myself. Thank you for supporting my blog!
For this project you will need:
- Assorted wooden beads – I found mine at Walmart however these circle and square beads are similar to what I used
- Hemp Cord
- Toothpicks
- Green spray paint (optional)
- Fine glitter (optional)
I wanted to paint the beads a light green to go along with my color scheme this year but that step is totally optional. I think just leaving the beads the natural wood color looks amazing as well! They would fit in perfectly with a natural themed tree. I left the square beads natural as those would be the trunk of the tree.
We had to come up with a way to paint the individual beads quickly. I did not want to paint them all by hand. That would have taken forever. So Mr. Wonderful came up with the idea to string them onto a wire hanger that was straightened out and spray paint them.

We hung the hanger between two sawhorses and spaced the beads out. Mr. W sprayed a coat on the top side of the beads. We sprinkled/blew glitter onto the beads while they were still wet. I am not sure if the glitter step was worth it. You can only see it a little and it made the bead bumpy looking. I think I would skip that step next time. After allowing the beads time to dry to touch, we spun the beads around and sprayed the other side.
When the beads are completely dry, you can start to assemble them. The tub of beads I had came in assorted shapes and sizes so I grouped some together so they would all be the same in a tree. You will need 15 circle beads for one tree plus 1-2 square beads for the trunk.
Cut a piece of the hemp cord about 3.5 ft long. Take one circle bead and string it on the cord. Move it to the center of the cord. Now take one end of the cord and string it back through the center of the bead. Another option is to stick the two ends of the cord in the opposite sides of the beads and pull both ends.

Next take two circle beads and string them on one side of the cord. Take the other side of the cord and run it through the two beads. Pull the beads all the way to the top by pulling on both sides of the cord so they fit snugly against the first bead.

Continue this process, increasing the number of beads in each line. The last line will have 5 beads. When adding the trunk at the bottom of the tree, I still wanted the hemp cord to be tight against the beads. I strung the cord back through the second bead on each side so the cord would be coming out at the correct placement it needed to be to make the trunk. Using the same method as above I added two square beads for a trunk.

When I held up the tree, the bottom layer of five sagged too much. I tried a couple different things to try to resolve this but ended up using a toothpick! It was the perfect size I needed to stabilize the bottom row. I just stuck it in one end and pushed it in until you could not see either end.

Finish off the bottom by tying a knot (preferable a square knot so it does not come untied!) in the hemp cord. Cut off the excess cord.

To hang your ornament, you can either use a normal ornament hook or tie on a piece of the hemp cord. I opted to use a hook since I flocked our Christmas tree this year. It is easier to hang ornaments on hooks so I don’t knock a bunch of the flocking off.


I like how they turned out. They are a fun addition to our Christmas tree this year!


See you tomorrow for the second day of Christmas! 🙂
Be sure to visit our fellow 12 Days of Christmas Bloggers below for even more creative ideas this holiday season!


I don’t know if these were meant for a Southwestern Style Tree, but they would look so great on one!
Yes they would!! 🙂
So clever! I would have never thought to use beads like this. Pinned!
Thanks Erlene!
I love the wooden bead Christmas trees! I’d love if you’d share your tutorial at my link party Sew It Cook It Craft It: http://www.sewhistorically.com/sew-it-cook-it-craft-it-link-party-35/
Thanks Lina! I will have to drop by your link party. Thanks for visiting! 🙂
Such sweet little wooden trees! Great job!
Thanks Megan!
How ingenious. They are so cute.
Thanks so much Debra! They were fun to make! 🙂